
-
Your shopping cart is empty!
All games need some sort of interaction with the player character. So far in Skyline we have the new character scripts to make it easy to get started with your character development but how do we make the character interact with items in the world and present feedback to the player.
Sensors, triggers and distance calculations are all tools of the mechanics developer. These widgets provide the means to send system event to the players scripts and actions where the developer can add their own code to make something cool happen when one of these events are received. Skyline has access to these cool event toys, both in action form and in Lua plus the forthcoming visual mechanics system. I have seen some cool Lua code that a few users has written to create player interactivity and though I would give it a try without using much Lua script and focusing on the available actions.
Actions provide one of the fastest user development options as they are fully C++ driven and run in realtime without an interpreter as with Lua and other scripting languages. This does make them less flexible but our team has tried to provide as many properties per action to make them as flexible as possible. So let's have a look and see if we can make a "Press E Key to Read Note" player character interaction.
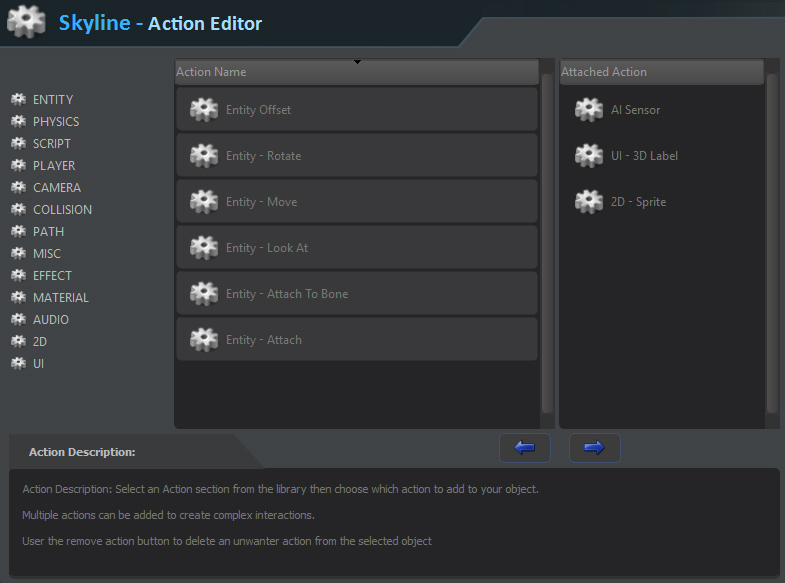
Setting up is made easy due to the editor side scripts. By using this simple script we can assign various actions to any selected object. For our notebook we will put a basic emitter in the place we will see the text and will also serve as the center to our sensor detection radius. Don't worry about the material as this is made invisible by the object's script.To resize the text simply scale down the emitter and the text will shrink/expand.
Download files: Activate Message Files.zip This video will quickly show you how to set up the mechanic.
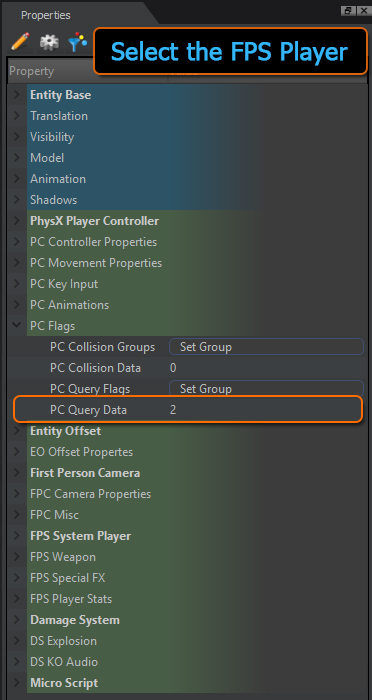
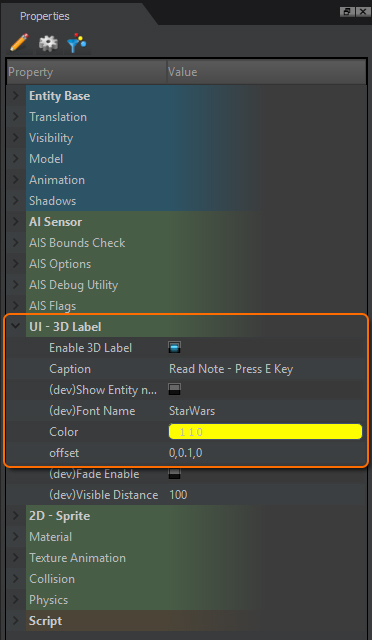
PLEASE NOTE: Select the FPS player in the scene and change its "PC Query Data" property to "2" or the sensor will fail to detect the player! See image below:
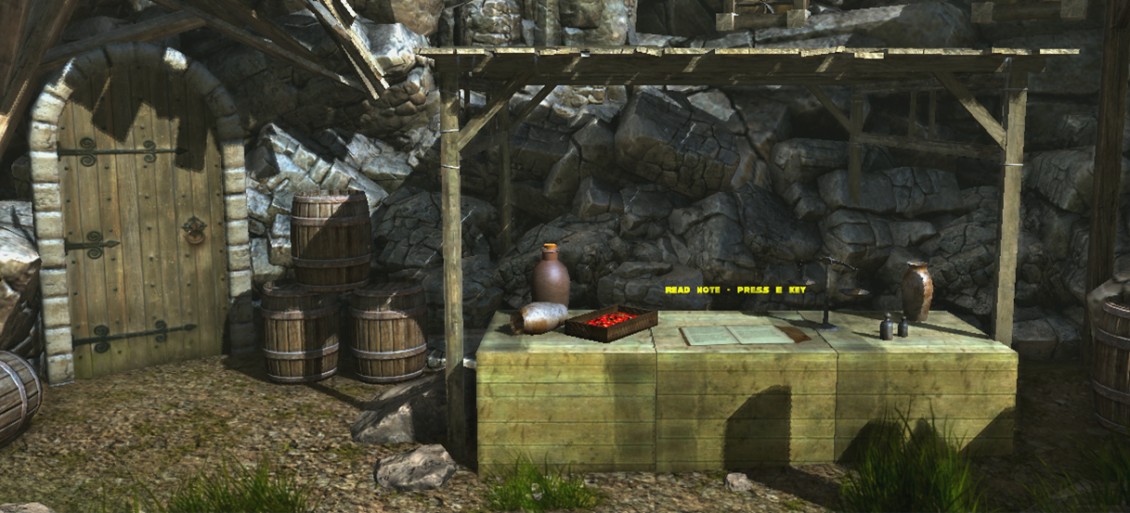
What do we need our character and objects to display and how will they interact? The character is to walk up to a table and see a note book, as the player gets closer some 3D text is displayed above the notebook. The 3D text reading "Press Activate Key!" enables the use of a predefined key event to trigger the opening of a UI image of the notebook.
First thing first, what actions and objects are we going to need.
1) "the player gets closer some 3D text is displayed above the notebook "- For this we will need a detection system. Skyline has 3 options: Trigger box, Trigger volume (PhysX), Sensor (Physx). We will use a spherical sensor as it is fast for detecting distance and has 3 events. We are going to use the Enter and Exit events.
2) "3D text is displayed above the notebook" - This can be done by using a UI 3D Label action.
3) " opening of a UI image of the notebook." - 2D Sprite action will work for displaying an image on the screen.
4) We will add a lua script to provide the mechanics with some dynamic properties so we can reuse the script in various situations.
For a matter of interest I will briefly cover the scripts and what they manage. The object script is very simple and does 2 main jobs.
Let's have a look at the script in 2 parts, part 1 covers the dynamic properties.
CODE:
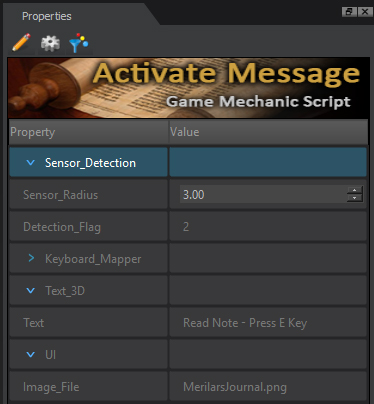
--[[HeaderImage|Mechanic_ActivateMessage_DynamicProperty_header.png]]

--------------------------------------------------------------------------
-- EDITOR: DETECTION
--------------------------------------------------------------------------
--[[Prop|Header]] Sensor_Detection = ""
--[[Prop|float]] Sensor_Radius = 3
--[[Prop|string]] Detection_Flag = "2"

detectionFlag = "2"
sensorRadius = 3

--------------------------------------------------------------------------
-- EDITOR: MAPPER
--------------------------------------------------------------------------
--[[Prop|Header]] Keyboard_Mapper = ""
--[[Prop|string]] Activate_Key = "e"

activateKey = "e"

--------------------------------------------------------------------------
-- EDITOR: 3D TEXT
--------------------------------------------------------------------------
--[[Prop|Header]] Text_3D = ""
--[[Prop|string]] Text = "Read Note - Press E Key"

txt = "Read Note - Press E Key"

--------------------------------------------------------------------------
-- EDITOR: UI Display
--------------------------------------------------------------------------
--[[Prop|Header]] UI = ""
--[[Prop|string]] Image_File = "MerilarsJournal.png"

imageName = "MerilarsJournal.png"

--------------------------------------------------------------------------
-- PRIVATE DATA
--------------------------------------------------------------------------
obj = 0;
materialName = ""
uiEnable = false;

--------------------------------------------------------------------------
-- SETUP DATA
--------------------------------------------------------------------------
function setupGame(id)
   setupDefaults();
   setup_DynamicValues( id )
   sensorID = action.getActionID(id, "AI Sensor")
   action.setActionParam(id, sensorID, "AIS Bounds Radius", sensorRadius);
   action.setActionParam(id, sensorID, "AIS Query Data", detectionFlag);

   actionID = action.getActionID(obj, "UI - 3D Label")
   action.setActionParam(obj, actionID, "Caption", txt);

   actionID = action.getActionID(obj, "2D - Sprite")
   action.setActionParam(obj, actionID, "Image File", imageName);
end

function setupDefaults()
   uiEnable = false;
   materialName = entity.getMaterialName(obj, 0);
   entity.setMaterialName(obj, "Invisible");
end

function setup_DynamicValues( id )
   detectionFlag = entity.getDynamicProperty(id, "Detection_Flag");
   sensorRadius = tonumber( entity.getDynamicProperty(id, "Sensor_Radius"));
   activateKey = entity.getDynamicProperty(id, "Activate_Key");
   txt =entity.getDynamicProperty(id, "Text");
   imageName =entity.getDynamicProperty(id, "Image_File");
end
Part 2 of the script is where the magic happens. Actions can be used in script by getting the actions ID, which is different to the objects ID. Each action creates its own ID which can be used to identify it in script by the getActionID(..) then you can set any of the actions properties by calling setActionParam(..).
   actionID = action.getActionID(obj, "UI - 3D Label")
   action.setActionParam(obj, actionID, "Enable 3D Label", "1");
   action.setActionParam(obj, actionID, "offset", "0,0.3,0");
You can see the properties we would change by using the previous script.
The following is the Main part of the Script showing how the events created by the sensor when the player enters its volume are handled.
---------------------------------------------------------------------------------
-- MAIN
---------------------------------------------------------------------------------
function onInit(objID)
	obj = objID;
	setupGame(objID)
	sky.print("Game Mechanic ID:"..obj.." Sensor Actived");
	actionID = action.getActionID(obj, "UI - 3D Label")
	action.setActionParam(obj, actionID, "Enable 3D Label", "0");
	sky.lprint("TEST*************************************",0);
end

function onSensorContact_Enter(targetID,distance)
	actionID = action.getActionID(obj, "UI - 3D Label")
	action.setActionParam(obj, actionID, "Enable 3D Label", "1");
	action.setActionParam(obj, actionID, "offset", "0,0.3,0");
	sky.print("Detected Target: "..targetID,1);
	uiEnable = true
end

function onSensorContact_Exit(targetID)
	sky.print("EXIT Target: "..targetID,1);
	actionID = action.getActionID(obj, "UI - 3D Label")
	action.setActionParam(obj, actionID, "Enable 3D Label", "0");
	uiEnable =false
end

function onKeyDown( key )
		actionID = action.getActionID(obj, "2D - Sprite")
		action.setActionParam(obj, actionID, "2D - Sprite Enabled", "0");

	if(key==activateKey and uiEnable==true)then
		sky.lprint("You Pressed the "..key.." Key");
		actionID = action.getActionID(obj, "2D - Sprite")
		action.setActionParam(obj, actionID, "2D - Sprite Enabled", "1");
	end
end

function onStop(  )
	entity.setMaterialName(obj, materialName);
end
Here is the editor side plugin code so you can examine how the actions are added and setup on the selected object.
function entity_main(objID)
	sky.lprint("Generating Activate Message Mechanic....");

	entity.setShadow(objID, 0 );

	--|----------------------------------------------------------------------------------------------------
	--| ADD SENSOR
	--|----------------------------------------------------------------------------------------------------
	sensorID = action.getActionID(objID, "AI Sensor")

	if(sensorID<=0)then
		sensorID = action.addToEntity(objID,"PLAYER", "AI Sensor");
	else
		sky.lprint("Warning: Adding Action - AI Sensor Action is already active.");
	end

	action.setActionParam(objID, sensorID, "AIS Bounds Check Type","0@Closest|All");
	action.setActionParam(objID, sensorID, "AIS Query Data","2");
	action.setActionParam(objID, sensorID, "AIS Bounds Radius","3");

	--|----------------------------------------------------------------------------------------------------
	--| ADD  3D TEXT
	--|----------------------------------------------------------------------------------------------------
	actionID = action.getActionID(objID, "UI - 3D Label")

	if(actionID<=0)then
		actionID = action.addToEntity(objID,"UI", "UI - 3D Label");
	else
		sky.lprint("Warning: Adding Action - UI - 3D Label Action is already active.");
	end

	action.setActionParam(objID, actionID, "Color","1,1,0");
	action.setActionParam(objID, actionID, "offset","0,0.3,0");

	--|----------------------------------------------------------------------------------------------------
	--| ADD  3D TEXT
	--|----------------------------------------------------------------------------------------------------
	actionID = action.getActionID(objID, "2D - Sprite")

	if(actionID<=0)then
		actionID = action.addToEntity(objID,"2D", "2D - Sprite");
	else
		sky.lprint("Warning: Adding Action - 2D - 2D - Sprite Action is already active.");
	end

	action.setActionParam(objID, actionID, "2D - Sprite Enabled","0");
	action.setActionParam(objID, actionID, "Image Position X","-75");
	action.setActionParam(objID, actionID, "Image Position Y","-70");
	action.setActionParam(objID, actionID, "Image Size X","150");
	action.setActionParam(objID, actionID, "Image Size Y","150");
	action.setActionParam(objID, actionID, "Blend Mode","4@SB_ADD|SB_COLOR|SB_ALPHA|SB_MODULATE|SB_REPLACE|SB_MINUS");
	action.setActionParam(objID, actionID, "Alpha Add","false");
end
That's it for this blog hope you enjoyed the read, Happy Skylining :D

Leave a Comment