-
Your shopping cart is empty!
MENU
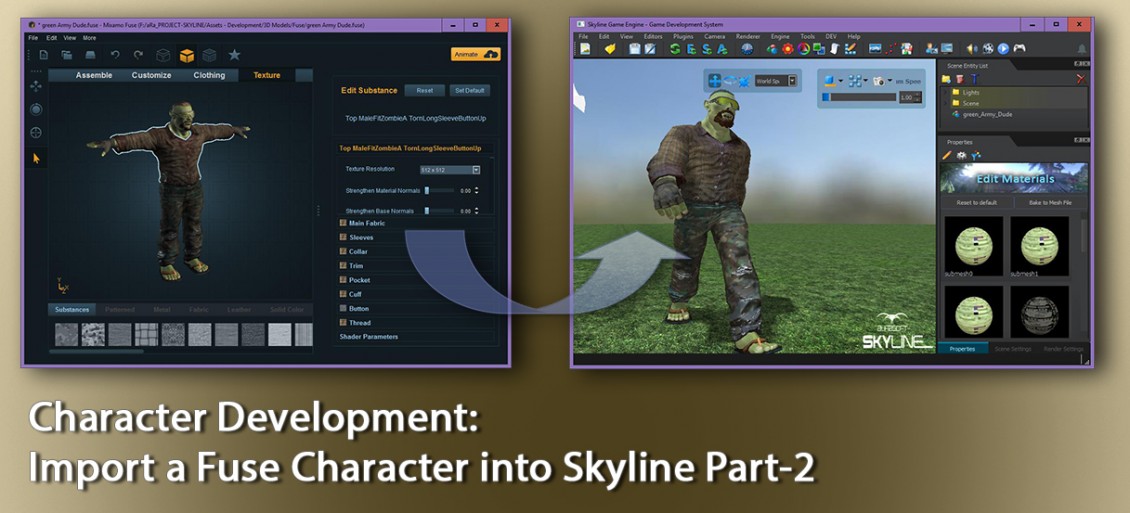
Welcome to part two of this exciting installment, well may be not that exciting but with this knowledge you will be creating some exciting games with your new characters taking center stage.
We have already looked at how to get our characters from Fuse to the mixamo website and back to the computer complete with animations. If you are unsure what this is all about I do recommend that you read part 1 of this tutorial to bring you up to speed, as in the following sections we will be bringing life to your creations and have them running around inside your Skyline scene. Piece of cake! no really, its not that hard I will show you how.
Skyline provides a quick asset manager tool that will automatically convert your character fbx files into ready to use Skyline static asset. Then with a little magic we will have the models come to life with your new animations.
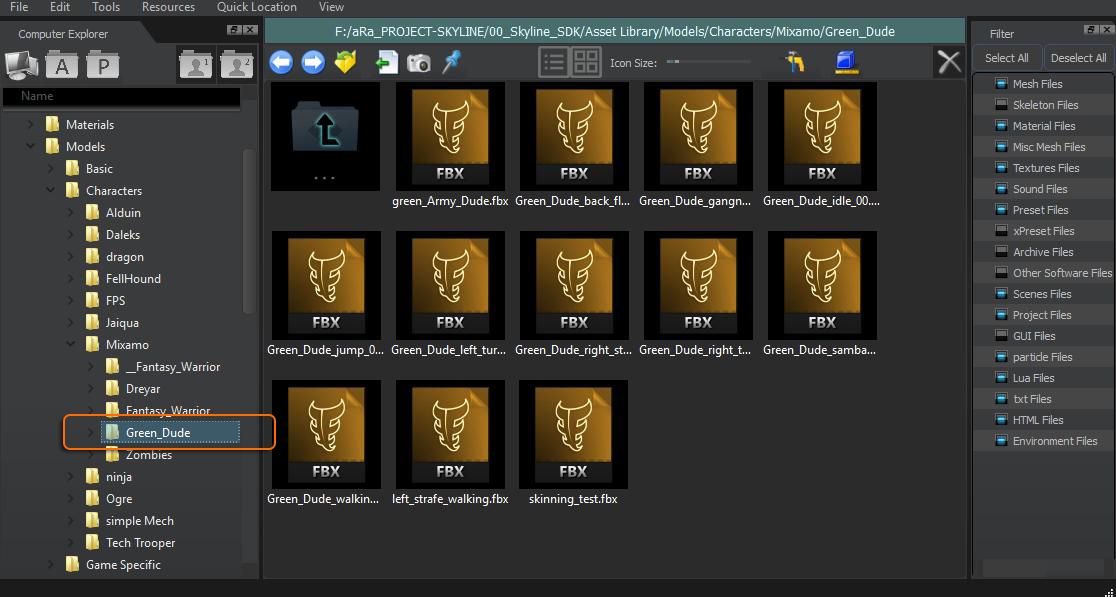
At the end of the part-1 we unzipped the downloaded files into a folder in the asset library, you will need to locate this folder inside Skylines Asset Manager. When you click on the folder for the first time Skyline will ask if you would like this folder to be added to the asset resources, click "OK" to continue.
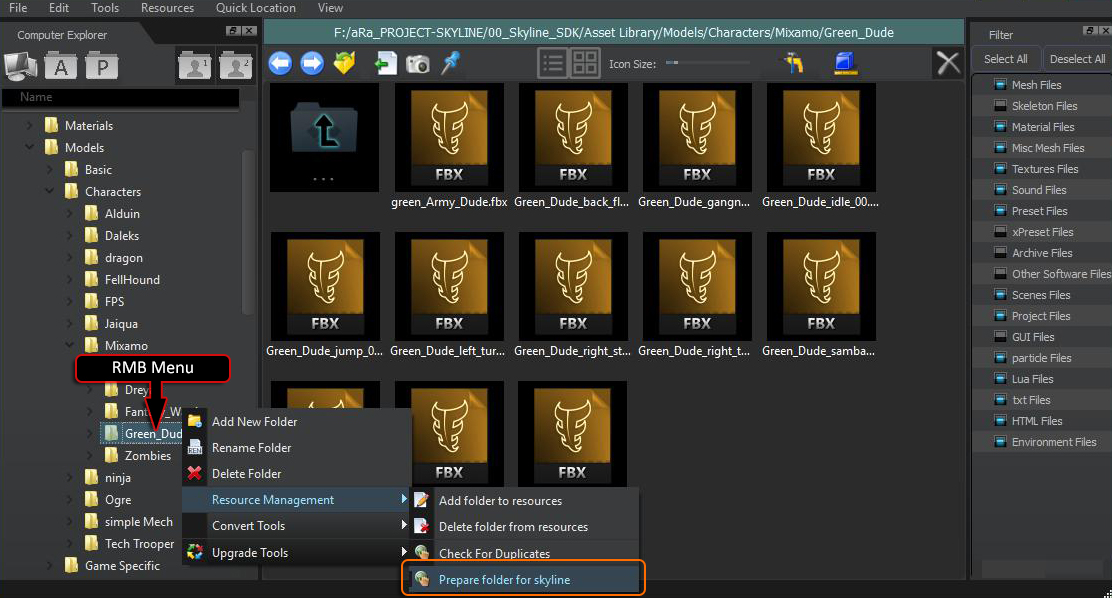
Then use the Right Mouse Button to open the folder menu and locate the Resources Management>Prepare Folder For Skyline option This will create all textures, materials and meshes from the provided fbx files. Any animation fbx's will be left unopened.
You will be provided with some options just go with the defaults for now and click "OK". After a few mins your folder will refresh displaying the converted assets.
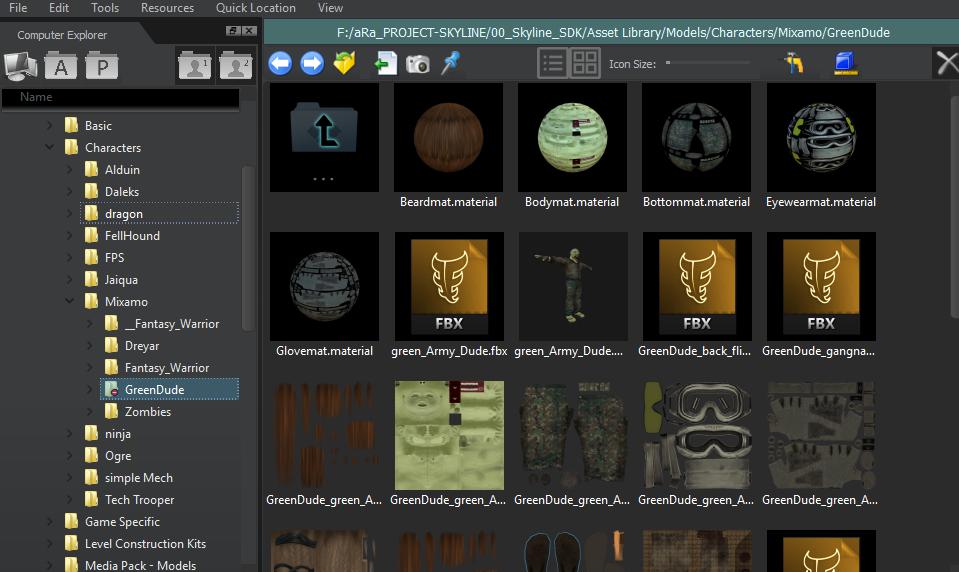
Select and drag into your scene the character mesh, easy to see as there will be a small thumbnail created for you. Note when the character is loaded in the scene it will be 10 times bigger. Generally with most non character assets, Skyline can auto scale these on folder preparation but with characters they will need animation files added and these can not be scaled until after they have been added to the character. We will be looking for a better way to improve this in future Skyline updates.
With the character selected in the scene, open the translation utility and set the uniform scale to 0.01 this will just make it easier to see the character as we set its animations. Note this is a temporary scale, once we have set up the animations we will scale and re-bake the mesh so that it will always be at the correct scale in the scene.
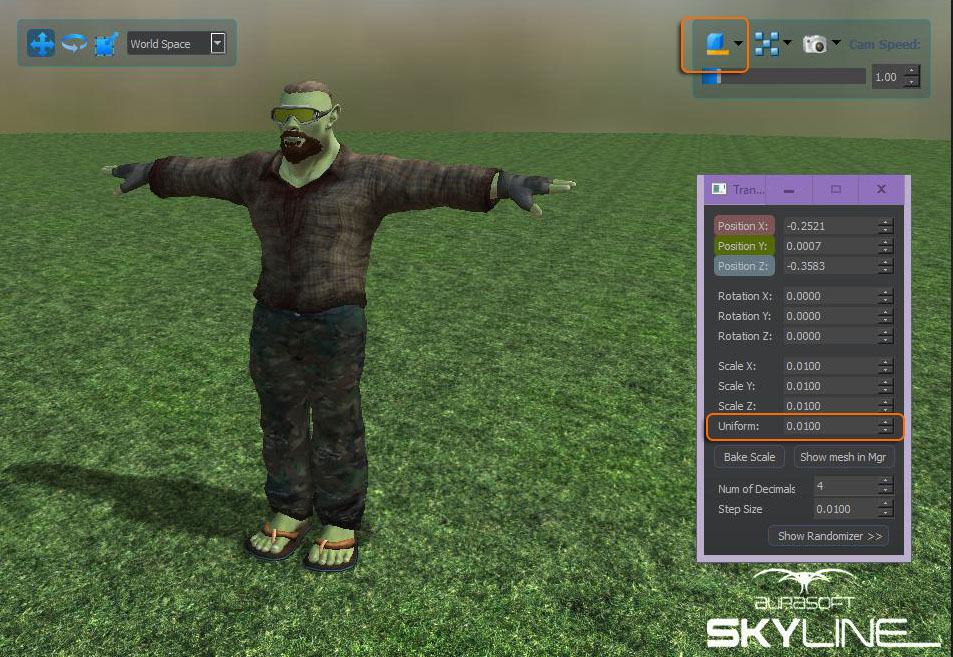
To add the animations we will need to use Skylines mesh editor. To open the mesh editor, select from the toolbar the following icon: Oh and make sure you select the character in the scene.
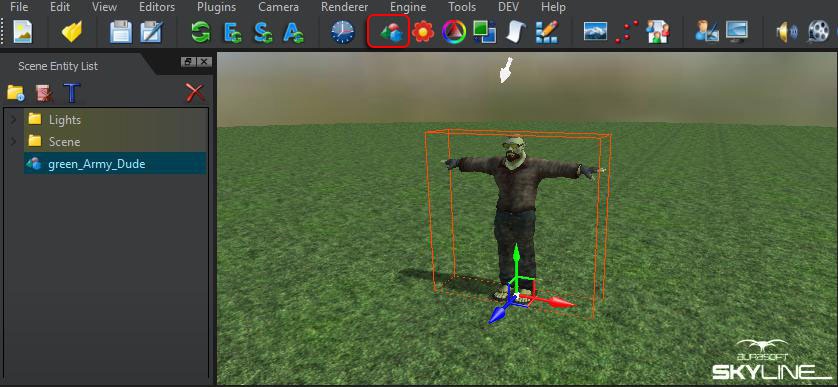
Once you have the mesh editor open select the import button to bring in the selected character for editing.

At the bottom section of the mesh editor there is a blank area ready for creating our animations. RMB in this area and select the "Add Animation" option.
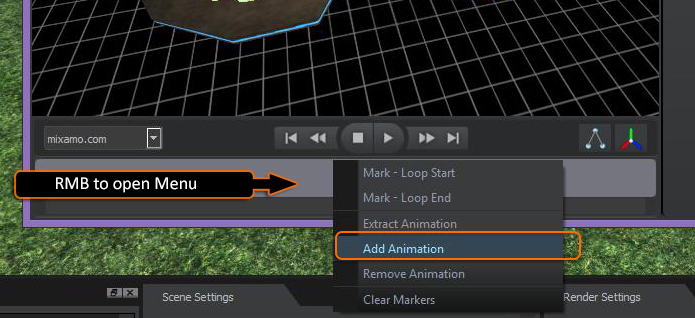
Locate your character folder and select the "character_walking_inPlace_00" animation, your name will obviously be different and in the next box that opens type in the name you want to be associated with this animation.
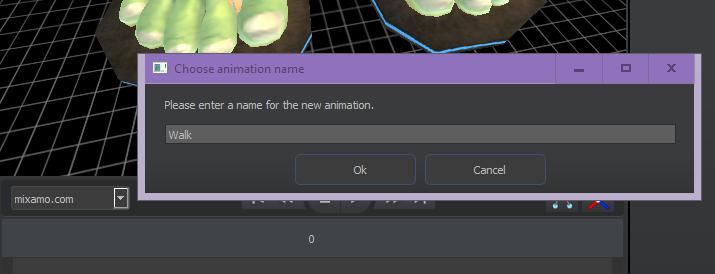
Your new animation will now be shown in the animation drop down.
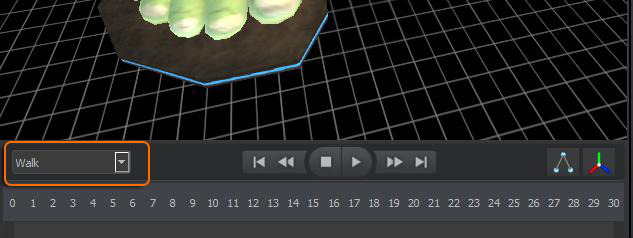
Repeat the steps until you have imported all of the animations you want to use on this character. Once you have all of the chosen animations added the dropdown will show them.

Now we have all anims in place one more task will be to resize the model to be in scale with Skylines units. Still in the mesh editor open the property "Mesh File Editing" and set the "Scale Offset" to (0.01 0.01 0.01) Dont forget to press enter!
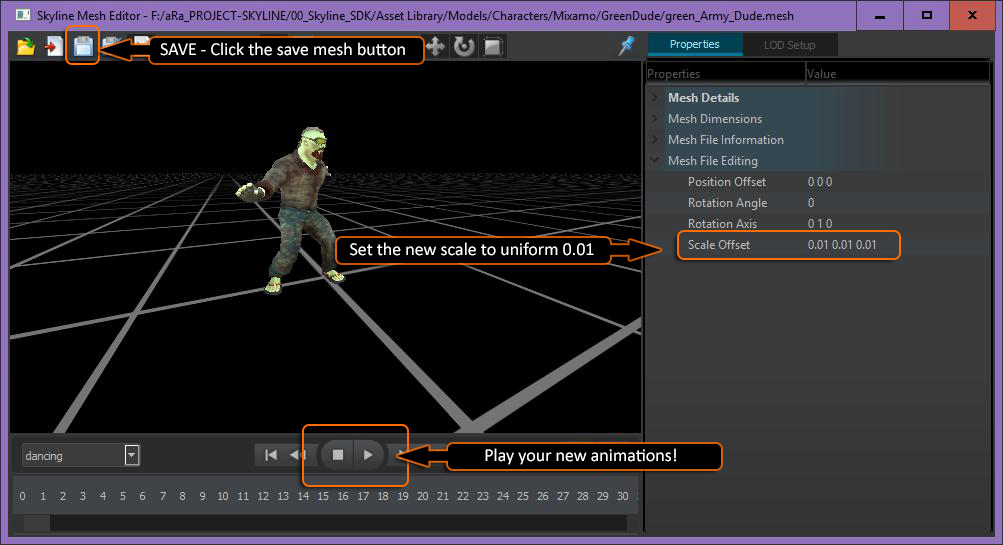
You can now zoom into the character (middle mouse wheel) and play the new animations. When ready press the "Save to Mesh" button to save all the changes back the the character mesh for later use. Now that the mesh is saved you can close down the mesh editor.
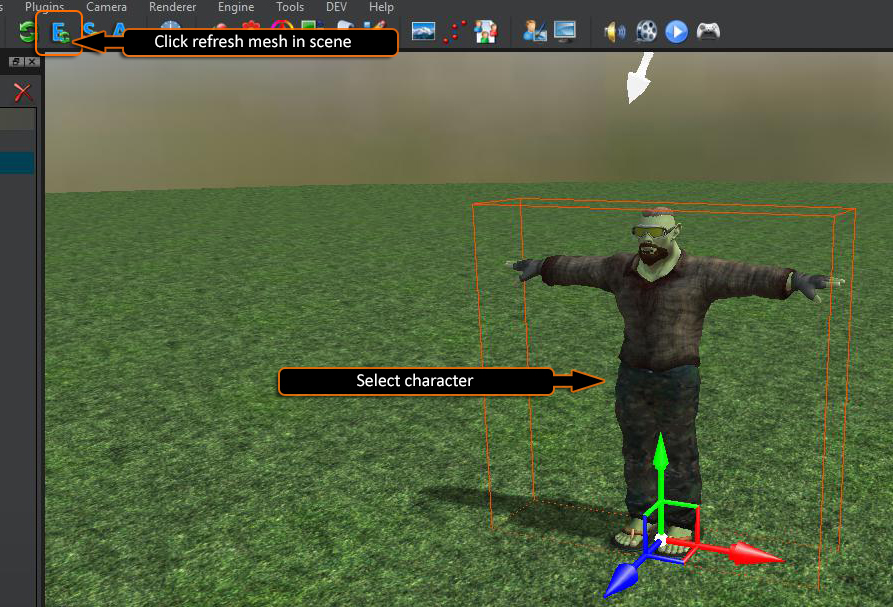
To bring the current character in the scene up to date, press the "reload entity" button from the scene editor toolbar. This will ensure it now uses the new character mesh we just edited and not the one in memory.
Some of mixamo's character texture uv's may require the normals to be flipped in the material. This will make the normal map shading look wrong as the simulated lightfall will be upside down. The fix is easy!
You will be wanting to tweak the materials so ensure the character is selected in your scene and open up the material editor. Select each sub material in turn and set its "Normal Map - Flip Vertical" option to checked.
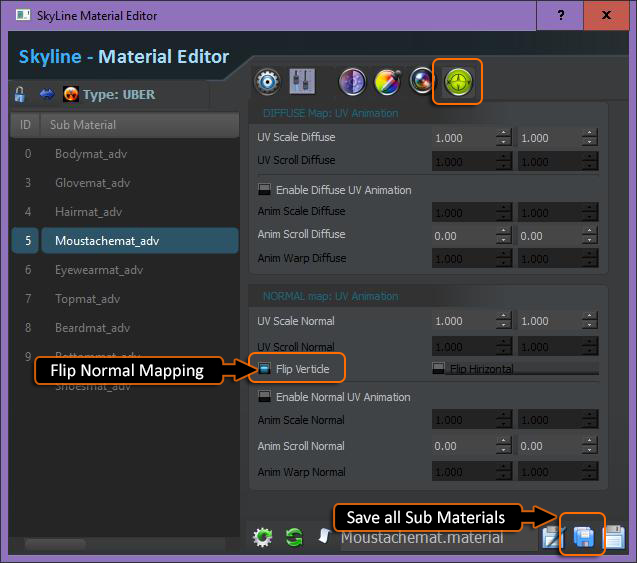
Now make adjustments to each sub material so that it looks how you want it to look. It is now important to save all the sub materials so we don't lose any changes.
Note: Dont forget to Save all Sub materials see image above.
Now press the scene animate button to see you animations.
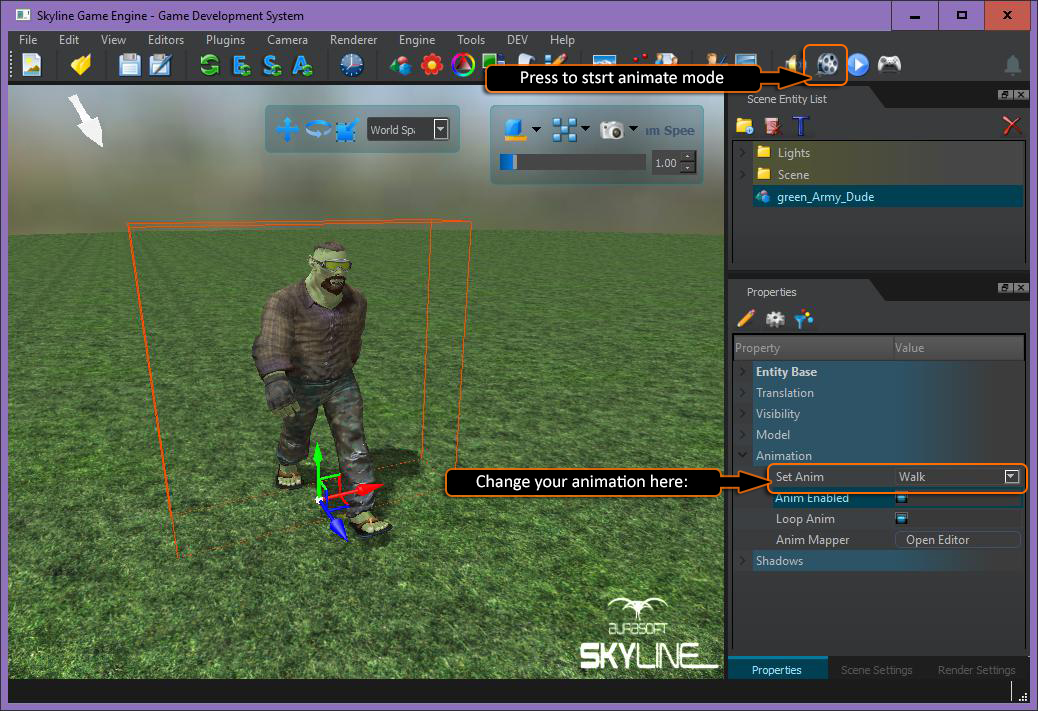
That about brings this tutorial to an end. We have seen how to get a character developed in Fuse to have animations from the mixamo site and import these into Skyline. We have also looked at some of Skylines Mesh editing tools to combine animations onto a character.
Next up would be adding your character controller scripts, ai or other fun goodies and start up some cool game action!
Hope you have enjoyed and found this tutorial helpful, Happy Skylining :)
Thank you for reading and see you out there in cyberspace ....
65 Comment(s)
Excellent article. Very interesting to read. I really love to read such a nice article. Thanks! keep rocking.
Excellent article. Very interesting to read. I really love to read such a nice article. Thanks! keep rocking.
Consider a 밤알바 in delivery for quick cash and a dynamic work environment.
Good artcile, but it would be better if in future you can share more about this subject. Keep posting.
I found this is an informative and interesting post so i think so it is very useful and knowledgeable. I would like to thank you for the efforts you have made in writing this article.
A very excellent blog post. I am thankful for your blog post. I have found a lot of approaches after visiting your post.
Nice to be visiting your blog again, it has been months for me. Well this article that i've been waited for so long. I need this article to complete my assignment in the college, and it has same topic with your article. Thanks, great share.
well, i bought some digital pedometer on the local walmart and it is great for monitoring your performance when walking”
ModelsNetWorth strives to provide accurate and authentic information about Models and prominent peoples, including their biography, Net Worth, Bust Size, Hip size, Height, and more.
Very useful info. Hope to see more posts soon!.
https://www.Replicawatches.cx offers various payment methods, including credit cards, Western Union, PayPal, and cryptocurrencies. The website claims to use encryption to secure transactions, aiming to provide a safe shopping experience. However, external reviews indicate that some customers have faced issues with payment processing and refunds. Reports mention difficulties in obtaining refunds for canceled orders and challenges in resolving payment-related concerns. These experiences highlight the importance of exercising caution when making payments on the site.
This is truly a great read for me. I have bookmarked it and I am looking forward to reading new articles. Keep up the good work!.
부산 방문 준비하며 살펴보니, 후기가 다양해서 선택에 수월했습니다. 비슷한 정보 찾는 분들은 아래 링크에서 자세히 보세요 부산비비기 최신주소
nice post, keep up with this interesting work. It really is good to know that this topic is being covered also on this web site so cheers for taking time to discuss this!
소액결제 현금화는 휴대폰 소액결제 한도를 이용해 디지털 상품권이나 콘텐츠 등을 구매한 뒤, 이를 다시 판매하여 현금으로 돌려받는 것을 말합니다
좋은 글 써주셔서 감사합니다. 앞으로도 많이 방문해서 찾아보겠습니다.
유익한 정보입니다. 새로운 글도 기대하고 있어요
캐릭터 개발에 관한 좋은 글이라고 생각합니다. 앞으로도 좋은 정보 기대하겠습니다.
멋진 글입니다. 앞으로의 활동도 기대하도록 하겠습니다.
서울 강남구에 위치한 하이퀄리티멤버쉽 강남룸싸롱은 회원제 프라이빗 룸과 고품격 서비스를 자랑합니다.
강남쩜오는 하이쩜오라고도 불리며, 강남구에서 큰 인기를 끌고 있는 고급 룸살롱 장르입니다. 럭셔리한 분위기와 수준 높은 서비스를 제공
강남쩜오는 하이쩜오라고도 불리며, 강남구에서 큰 인기를 끌고 있는 고급 룸살롱 장르입니다. 럭셔리한 분위기와 수준 높은 서비스를 제공강남달토는 강남 유흥가의 최신 트렌드로 떠오른 하이엔드 셔츠룸 가라오케입니다. '달토'는 *'달리는 토끼'*의 줄임말로, 스피디하고
멋진 글 잘 보고 갑니다. 파타야 가라오케를 찾으신다면 꼭 이 글을 봐주세요
Terrific article! This is the kind of info that should be shared around the web. Shame on Google for now not positioning this submit upper! Come on over and seek advice from my web site . Thanks =)
Hello.This article was extremely fascinating, particularly since I was searching for thoughts on this topic last Saturday.
I am sure this piece of writing has touched all the internet viewers, its really really fastidious post on building up new web site.
You've made some good points there. I checked on the internet for more information about the issue and found most individuals will go along with your views on this web site.
You made some good points there. I looked on the internet for more info about the issue and found most individuals will go along with your views on this web site.
What's up, I log on to your blogs like every week. Your humoristic style is witty, keep up the good work!
Whoa! This blog looks exactly like my old one! It's on a completely different subject but it has pretty much the same layout and design. Outstanding choice of colors!
I will immediately take hold of your rss as I can’t find your email subscription link or e-newsletter service. Do you’ve any? Kindly permit me understand in order that I may subscribe. Thanks.
Hi, I read your blogs daily. Your writing style is witty, keep up the good work!
Thanks a lot for sharing this excellent info! I am looking forward to seeing more posts by you as soon as possible! I have judged that you do not compromise on quality.
I will immediately seize your rss feed as I can not find your e-mail subscription link or newsletter service. Do you have any? Kindly permit me recognise in order that I may just subscribe. Thanks.
These are truly fantastic ideas in regarding blogging. You have touched some fastidious points here. Any way keep up wrinting.
Rattling clean internet site, thank you for this post.
It's actually very complex in this busy life to listen news on Television, thus I only use web for that purpose, and get the most up-to-date news.
Ahaa, its good dialogue regarding this article here at this webpage, I have read all that, so now me also commenting at this place.
It's very trouble-free to find out any matter on web as compared to textbooks, as I found this paragraph at this site.
Got amazing results on my niche site thanks to Indorank Media.
Nice to be visiting your blog once more, it has been months for me. Well this article that I have been waited for therefore long.
Hi there it's me, I am also visiting this site daily, this web site is actually nice and the visitors are genuinely sharing nice thoughts.
Ahaa, its good dialogue concerning this piece of writing at this place at this weblog, I have read all that, so now me also commenting here.
I want to to thank you for this very good read!! I definitely enjoyed every little bit of it. I have got you bookmarked to check out new things you
Hola! I've been following your website for a while now and finally got the courage to go ahead and give you a shout out from Atascocita Tx! Just wanted to tell you keep up the good job!
Great post.Ne'er knew this, thanks for letting me know.
These are genuinely impressive ideas in concerning blogging. You have touched some nice points here. Any way keep up wrinting.
I could not refrainn fromm commenting. Exceptionally well written!
I am sure this post has touched all the internet viewers, its really really fastidious article on building up new webpage.
i love to visit this blog
I am curious to find out what blog system you happen to be using? I’m experiencing some minor security problems with my latest site and I’d like to find something more secure. Do you have any solutions?
Hello my friend! I wish to say that this post is amazing, great written and include approximately all important infos. I'd like to peer extra posts like this.
Ahaa, its pleasant discussion on the topic of this paragraph here at this web site, I have read all that, so at this time me also commenting here.
There's definately a great deal to find out about this issue. I really like all the points you have made.
I visited many blogs except the audio quality for audio songs existing at this web site is genuinely fabulous.
I will right away take hold of your rss feed as I can’t in finding your e-mail subscription hyperlink or newsletter service. Do you’ve any? Kindly let me understand in order that I may subscribe. Thanks.
I enjoy what you guys are up too. This kind of clever work and coverage! Keep up the terrific works guys I've incorporated you guys to my personal blogroll.
i love to visit this blog
I enjoy what you guys are up too. This sort of clever work and coverage! Keep up the terrific works guys I've added you guys to my personal blogroll.
Ahaa, its nice discussion concerning this paragraph at this place at this blog, I have read all that, so now me also commenting here.
Great articles and great layout. Your blog post deserves all of the positive feedback it’s been getting.
Your blog is one of a kind, i love the way you organize the topics.:’-”‘
소액결제 현금화는 통신사(SKT, KT, LGU+)에서 부여한 월 휴대폰 소액결제 한도(최대 100만 원)를 이용해 상품권 등을 구매 후, 이를 전문 업체에 판매하여 수수료
As i purchased with your blog site while positioning fascination purely a little bit little submits. Fulfilling technique for extended, We will be book-marking during a period attain forms finish happens further up.
Your content always impresses, mantri mall apk — creative, authentic, and deeply engaging. Excellent work!
Leave a Comment