
-
Your shopping cart is empty!
All games need some sort of interaction with the player character. So far in Skyline we have the new character scripts to make it easy to get started with your character development but how do we make the character interact with items in the world and present feedback to the player.
Sensors, triggers and distance calculations are all tools of the mechanics developer. These widgets provide the means to send system event to the players scripts and actions where the developer can add their own code to make something cool happen when one of these events are received. Skyline has access to these cool event toys, both in action form and in Lua plus the forthcoming visual mechanics system. I have seen some cool Lua code that a few users has written to create player interactivity and though I would give it a try without using much Lua script and focusing on the available actions.
Actions provide one of the fastest user development options as they are fully C++ driven and run in realtime without an interpreter as with Lua and other scripting languages. This does make them less flexible but our team has tried to provide as many properties per action to make them as flexible as possible. So let's have a look and see if we can make a "Press E Key to Read Note" player character interaction.
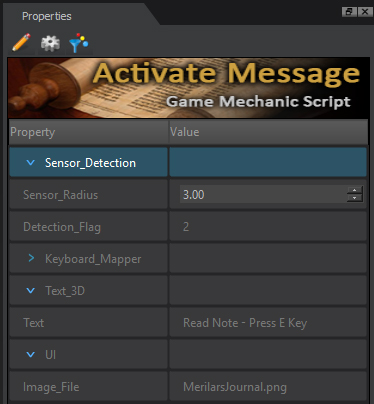
Setting up is made easy due to the editor side scripts. By using this simple script we can assign various actions to any selected object. For our notebook we will put a basic emitter in the place we will see the text and will also serve as the center to our sensor detection radius. Don't worry about the material as this is made invisible by the object's script.To resize the text simply scale down the emitter and the text will shrink/expand.
Download files: Activate Message Files.zip This video will quickly show you how to set up the mechanic.
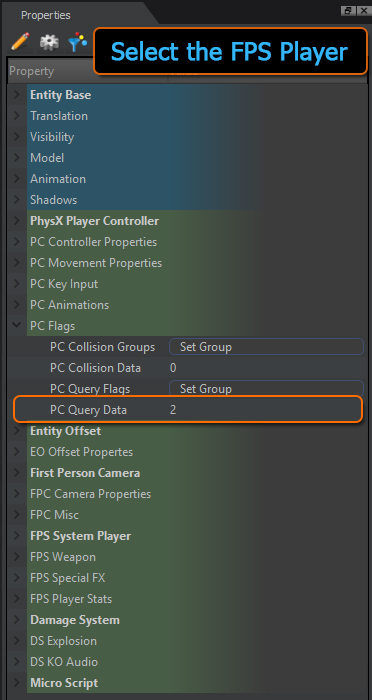
PLEASE NOTE: Select the FPS player in the scene and change its "PC Query Data" property to "2" or the sensor will fail to detect the player! See image below:
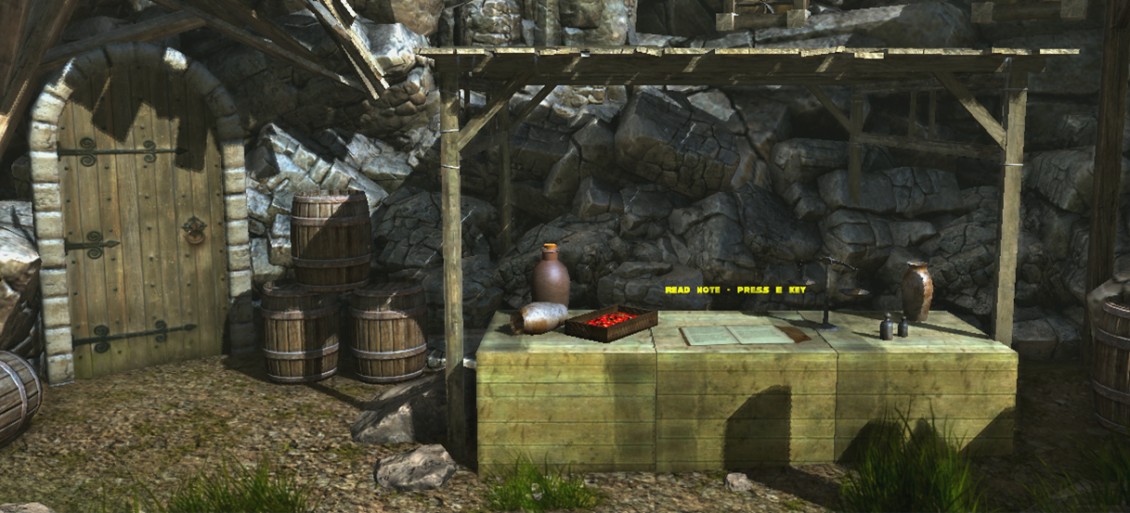
What do we need our character and objects to display and how will they interact? The character is to walk up to a table and see a note book, as the player gets closer some 3D text is displayed above the notebook. The 3D text reading "Press Activate Key!" enables the use of a predefined key event to trigger the opening of a UI image of the notebook.
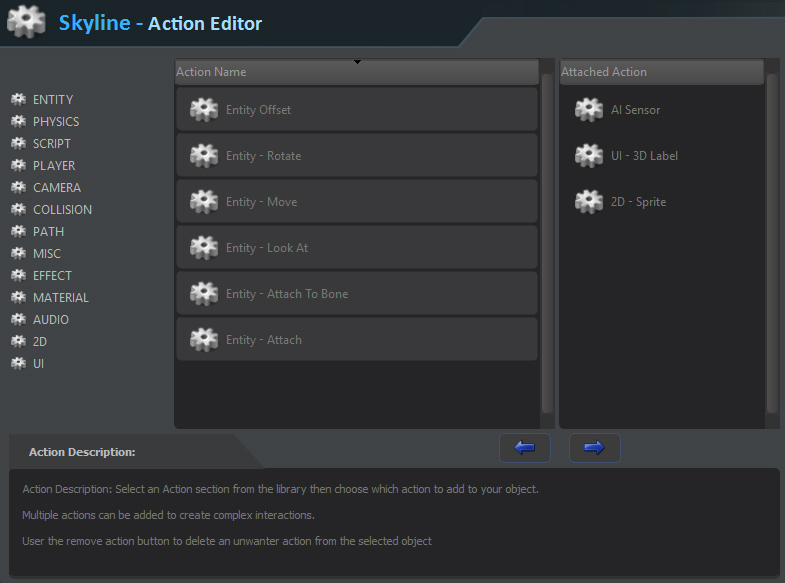
First thing first, what actions and objects are we going to need.
1) "the player gets closer some 3D text is displayed above the notebook "- For this we will need a detection system. Skyline has 3 options: Trigger box, Trigger volume (PhysX), Sensor (Physx). We will use a spherical sensor as it is fast for detecting distance and has 3 events. We are going to use the Enter and Exit events.
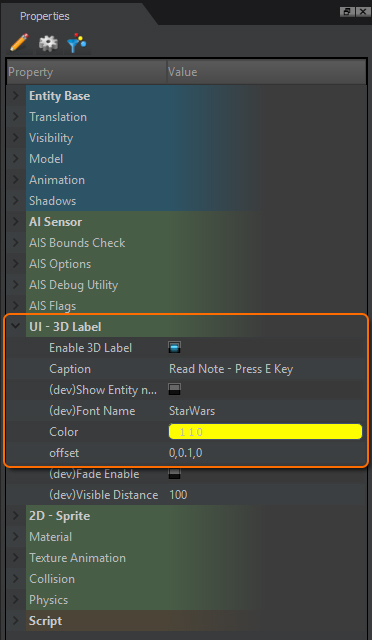
2) "3D text is displayed above the notebook" - This can be done by using a UI 3D Label action.
3) " opening of a UI image of the notebook." - 2D Sprite action will work for displaying an image on the screen.
4) We will add a lua script to provide the mechanics with some dynamic properties so we can reuse the script in various situations.
For a matter of interest I will briefly cover the scripts and what they manage. The object script is very simple and does 2 main jobs.
Let's have a look at the script in 2 parts, part 1 covers the dynamic properties.
CODE:
--[[HeaderImage|Mechanic_ActivateMessage_DynamicProperty_header.png]]

--------------------------------------------------------------------------
-- EDITOR: DETECTION
--------------------------------------------------------------------------
--[[Prop|Header]] Sensor_Detection = ""
--[[Prop|float]] Sensor_Radius = 3
--[[Prop|string]] Detection_Flag = "2"

detectionFlag = "2"
sensorRadius = 3

--------------------------------------------------------------------------
-- EDITOR: MAPPER
--------------------------------------------------------------------------
--[[Prop|Header]] Keyboard_Mapper = ""
--[[Prop|string]] Activate_Key = "e"

activateKey = "e"

--------------------------------------------------------------------------
-- EDITOR: 3D TEXT
--------------------------------------------------------------------------
--[[Prop|Header]] Text_3D = ""
--[[Prop|string]] Text = "Read Note - Press E Key"

txt = "Read Note - Press E Key"

--------------------------------------------------------------------------
-- EDITOR: UI Display
--------------------------------------------------------------------------
--[[Prop|Header]] UI = ""
--[[Prop|string]] Image_File = "MerilarsJournal.png"

imageName = "MerilarsJournal.png"

--------------------------------------------------------------------------
-- PRIVATE DATA
--------------------------------------------------------------------------
obj = 0;
materialName = ""
uiEnable = false;

--------------------------------------------------------------------------
-- SETUP DATA
--------------------------------------------------------------------------
function setupGame(id)
   setupDefaults();
   setup_DynamicValues( id )
   sensorID = action.getActionID(id, "AI Sensor")
   action.setActionParam(id, sensorID, "AIS Bounds Radius", sensorRadius);
   action.setActionParam(id, sensorID, "AIS Query Data", detectionFlag);

   actionID = action.getActionID(obj, "UI - 3D Label")
   action.setActionParam(obj, actionID, "Caption", txt);

   actionID = action.getActionID(obj, "2D - Sprite")
   action.setActionParam(obj, actionID, "Image File", imageName);
end

function setupDefaults()
   uiEnable = false;
   materialName = entity.getMaterialName(obj, 0);
   entity.setMaterialName(obj, "Invisible");
end

function setup_DynamicValues( id )
   detectionFlag = entity.getDynamicProperty(id, "Detection_Flag");
   sensorRadius = tonumber( entity.getDynamicProperty(id, "Sensor_Radius"));
   activateKey = entity.getDynamicProperty(id, "Activate_Key");
   txt =entity.getDynamicProperty(id, "Text");
   imageName =entity.getDynamicProperty(id, "Image_File");
end
Part 2 of the script is where the magic happens. Actions can be used in script by getting the actions ID, which is different to the objects ID. Each action creates its own ID which can be used to identify it in script by the getActionID(..) then you can set any of the actions properties by calling setActionParam(..).
   actionID = action.getActionID(obj, "UI - 3D Label")
   action.setActionParam(obj, actionID, "Enable 3D Label", "1");
   action.setActionParam(obj, actionID, "offset", "0,0.3,0");
You can see the properties we would change by using the previous script.
The following is the Main part of the Script showing how the events created by the sensor when the player enters its volume are handled.
---------------------------------------------------------------------------------
-- MAIN
---------------------------------------------------------------------------------
function onInit(objID)
	obj = objID;
	setupGame(objID)
	sky.print("Game Mechanic ID:"..obj.." Sensor Actived");
	actionID = action.getActionID(obj, "UI - 3D Label")
	action.setActionParam(obj, actionID, "Enable 3D Label", "0");
	sky.lprint("TEST*************************************",0);
end

function onSensorContact_Enter(targetID,distance)
	actionID = action.getActionID(obj, "UI - 3D Label")
	action.setActionParam(obj, actionID, "Enable 3D Label", "1");
	action.setActionParam(obj, actionID, "offset", "0,0.3,0");
	sky.print("Detected Target: "..targetID,1);
	uiEnable = true
end

function onSensorContact_Exit(targetID)
	sky.print("EXIT Target: "..targetID,1);
	actionID = action.getActionID(obj, "UI - 3D Label")
	action.setActionParam(obj, actionID, "Enable 3D Label", "0");
	uiEnable =false
end

function onKeyDown( key )
		actionID = action.getActionID(obj, "2D - Sprite")
		action.setActionParam(obj, actionID, "2D - Sprite Enabled", "0");

	if(key==activateKey and uiEnable==true)then
		sky.lprint("You Pressed the "..key.." Key");
		actionID = action.getActionID(obj, "2D - Sprite")
		action.setActionParam(obj, actionID, "2D - Sprite Enabled", "1");
	end
end

function onStop(  )
	entity.setMaterialName(obj, materialName);
end
Here is the editor side plugin code so you can examine how the actions are added and setup on the selected object.
function entity_main(objID)
	sky.lprint("Generating Activate Message Mechanic....");

	entity.setShadow(objID, 0 );

	--|----------------------------------------------------------------------------------------------------
	--| ADD SENSOR
	--|----------------------------------------------------------------------------------------------------
	sensorID = action.getActionID(objID, "AI Sensor")

	if(sensorID<=0)then
		sensorID = action.addToEntity(objID,"PLAYER", "AI Sensor");
	else
		sky.lprint("Warning: Adding Action - AI Sensor Action is already active.");
	end

	action.setActionParam(objID, sensorID, "AIS Bounds Check Type","0@Closest|All");
	action.setActionParam(objID, sensorID, "AIS Query Data","2");
	action.setActionParam(objID, sensorID, "AIS Bounds Radius","3");

	--|----------------------------------------------------------------------------------------------------
	--| ADD  3D TEXT
	--|----------------------------------------------------------------------------------------------------
	actionID = action.getActionID(objID, "UI - 3D Label")

	if(actionID<=0)then
		actionID = action.addToEntity(objID,"UI", "UI - 3D Label");
	else
		sky.lprint("Warning: Adding Action - UI - 3D Label Action is already active.");
	end

	action.setActionParam(objID, actionID, "Color","1,1,0");
	action.setActionParam(objID, actionID, "offset","0,0.3,0");

	--|----------------------------------------------------------------------------------------------------
	--| ADD  3D TEXT
	--|----------------------------------------------------------------------------------------------------
	actionID = action.getActionID(objID, "2D - Sprite")

	if(actionID<=0)then
		actionID = action.addToEntity(objID,"2D", "2D - Sprite");
	else
		sky.lprint("Warning: Adding Action - 2D - 2D - Sprite Action is already active.");
	end

	action.setActionParam(objID, actionID, "2D - Sprite Enabled","0");
	action.setActionParam(objID, actionID, "Image Position X","-75");
	action.setActionParam(objID, actionID, "Image Position Y","-70");
	action.setActionParam(objID, actionID, "Image Size X","150");
	action.setActionParam(objID, actionID, "Image Size Y","150");
	action.setActionParam(objID, actionID, "Blend Mode","4@SB_ADD|SB_COLOR|SB_ALPHA|SB_MODULATE|SB_REPLACE|SB_MINUS");
	action.setActionParam(objID, actionID, "Alpha Add","false");
end
That's it for this blog hope you enjoyed the read, Happy Skylining :D


42 Comment(s)
Hi to every , for the reason that I am really eager of reading this blog's post to be updated on a regular basis. It consists of fastidious data.
Ahaa, its good discussion regarding this post at this place at this weblog, I have read all that, so now me also commenting here.
Nice weblog right here! Also your website loads up very fast! What web host are you the use of? Can I get your affiliate hyperlink in your host? I desire my web site loaded up as fast as yours lol.
Hello there, I found your website by means of Google at the same time as looking for a similar matter, your site got here up, it appears to be like good. I have bookmarked it in my google bookmarks.
Incredible! This blog looks just like my old one! It’s on a completely different topic but it has pretty much the same layout and design. Excellent choice of colors!
I am sure this piece of writing has touched all the internet people, its really really fastidious paragraph on building up new weblog.
Your mode of explaining everything in this piece of writing is truly good, every one be able to easily understand it, Thanks a lot.
Hey! Someone in my Facebook group shared this website with us so I came to take a look. I'm definitely loving the information. I'm book-marking and will be tweeting this to my followers! Great blog and superb style and design.
I love gathering utile info, this post has got me even more info!
These are actually fantastic ideas in about blogging. You have touched some nice points here. Any way keep up wrinting.
I really like what you guys are up too. This sort of clever work and exposure! Keep up the good works guys I've incorporated you guys to my own blogroll.
Greetings! Very useful advice within this article! It's the little changes that make the most significant changes. Thanks for sharing!
I like what you guys are up too. Such smart work and reporting! Carry on the superb works guys I have incorporated you guys to my blogroll. I think it will improve the value of my site :).
Ahaa, its pleasant conversation about this post at this place at this blog, I have read all that, so at this time me also commenting here.
We're a bunch of volunteers and opening a brand new scheme in our community. Your site provided us with useful info to work on. You have performed an impressive job and our entire community shall be grateful to you.
I’ll right away grasp your rss feed as I can not to find your email subscription hyperlink or e-newsletter service. Do you have any? Please allow me recognise so that I may just subscribe. Thanks.
I am sure this paragraph has touched all the internet visitors, its really really fastidious article on building up new website.
Whoa! This blog looks just like my old one! It's on a totally different subject but it has pretty much the same page layout and design. Superb choice of colors!
I wanted to thank you for this fantastic read!! I certainly loved every little bit of it. I have you bookmarked to check out new stuff you
hi!,I love your writing so so much! percentage we communicate more about your article on AOL? I need an expert on this house to resolve my problem. May be that is you! Having a look ahead to see you.
It's actually a cool and useful piece of information. I'm happy that you shared this helpful info with us. Please keep us informed like this. Thanks for sharing.
Very shortly this website will be famous among all blog users, due to it's pleasant articles or reviews
Ahaa, its good discussion on the topic of this article here at this weblog, I have read all that, so at this time me also commenting here.
I amm shre this paragraph has touched alll thhe intternet viewers, itss really really plleasant piece off wriuting onn building uup neew website.
I'll immediately grab your rss feed as I can not find your e-mail subscription link or e-newsletter service. Do you've any? Kindly let me know so that I may just subscribe. Thanks.
I will right away snatch your rss feed as I can’t in finding your email subscription link or newsletter service. Do you have any? Kindly allow me know in order that I may just subscribe. Thanks.
Ahaa, its pleasant discussion on the topic of this article at this place at this website, I have read all that, so now me also commenting at this place.
I really like your writing style, wonderful information, thank you for posting :D.
인천출장안마 - 인천 전역에 24시간 여성 전문 마사지사가 찾아가는 출장 안마 서비스! 아로마, 스포츠, 커플 마사지로 피로와 스트레스를 합리적 가격에 풀어보세요
I really like it when individuals get together and share ideas. Great site, stick with it!
Ahaa, its pleasant discussion on the topic of this article at this place at this website, I have read all that, so now me also commenting at this place.
타임케어 출장홈타이 - 출장마사지와 출장안마 홈타이 서비스를 전국 어디서나 24시간 편하게! 전문 마사지사의 맞춤 홈케어로 피로를 빠르게 해소하고 최상의 힐링을 경험하세요. 선입금 없는 후불제 운영으로 더욱 안심!
소액결제현금화란 무엇인가? · 소액결제현금화는 휴대폰 소액결제 서비스를 활용해 현금을 확보하는 방법을 말합니다.
I am sure this post has touched all the internet visitors, its really really pleasant article on building up new web site.
I want to to thank you for this fantastic read!! I absolutely loved every little bit of it. I have you book-marked to check out new stuff you
I offer professional graphic design services including logo design, custom logos, banners, social media graphics, and complete branding digital design services to help your business stand out. I also specialize in sales thread design and other professional design solutions tailored to your brand identity. Every project is created with a clean, modern, and high-quality approach to ensure strong visual impact and better engagement. Let’s build powerful visuals that represent your brand the right way.
I am sure this article has touched all the internet users, its really really pleasant post on building up new web site.
I intend to peruse this. I'll make sure to return. I appreciate you sharing. moreover, this post provides the light that allows us to see truth. This one is excellent and provides detailed information. I appreciate this well-written essay.
I intend to peruse this. I'll make sure to return. I appreciate you sharing. moreover, this post provides the light that allows us to see truth. This one is excellent and provides detailed information. I appreciate this well-written essay.
I truly appreciate the helpful and insightful material on your website. It is a really good post that uses a lot of our resources.I appreciate you sharing. I like reading this post.
More readers would be interested in the works of authors if more of them took the time to create excellent material, as you do. I've gained much too much knowledge from your post.
I appreciate your great blog. Where else might I get information conveyed in such a flawless manner? I have a project that I am currently working on, and I have been watching for such info.
Leave a Comment